| | | |
Creating and Using Custom Patterns
![Pattern Stamp Tool [S]](files/pattern_stamp_tool.gif) The Adobe Photoshop Pattern Stamp tool allows you to paint on an image using pre-defined patterns.
You can use the patterns that are already in the Photoshop pattern libraries or you can create your own patterns for use with the pattern stamp tool.
In this tutorial we will define three wood grain patterns and I will show you how to use those patterns to create unique images. The Adobe Photoshop Pattern Stamp tool allows you to paint on an image using pre-defined patterns.
You can use the patterns that are already in the Photoshop pattern libraries or you can create your own patterns for use with the pattern stamp tool.
In this tutorial we will define three wood grain patterns and I will show you how to use those patterns to create unique images.
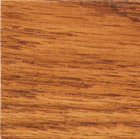
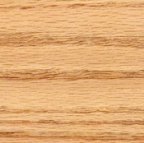
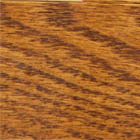
Begin by saving the three pictures below of the wood textures that we will be using in this tutorial.
Or you can use the Google image search engine and find just about any texture that you would like to use.
Right click on each image and choose save picture as... from the options. Save the images in any directory that you prefer.
   Once you have the images saved, open them in Photoshop. Using the rectangular marquee tool, drag a selection box around the
portion of the image that you want to use for a pattern. In this case we will draw a selection box around the entire image. Or you can hit Ctrl+A to select the entire image.
With the image selected click on Edit and then choose Define Pattern... from the menu. You will then be prompted for
a name for your new pattern. Photoshop will use the file name as a default name but you can name it what ever you like.
Do this process on all three of the wood textures. You can now close all of the images.
Once you have the images saved, open them in Photoshop. Using the rectangular marquee tool, drag a selection box around the
portion of the image that you want to use for a pattern. In this case we will draw a selection box around the entire image. Or you can hit Ctrl+A to select the entire image.
With the image selected click on Edit and then choose Define Pattern... from the menu. You will then be prompted for
a name for your new pattern. Photoshop will use the file name as a default name but you can name it what ever you like.
Do this process on all three of the wood textures. You can now close all of the images.
 Click on the Pattern Stamp Tool [S] from the Photoshop toolbar. The options for the pattern stamp tool will show
across the top of the screen. The options bar allows you to change the brush and brush size, the blending mode of the tool,
the opacity and flow of the pen used to paint the pattern and the pattern palette drop down menu.
If you select Aligned, you can release the mouse button without losing the current sampling point. As a result, the sampled pixels are applied continuously, no matter how many times you stop and resume painting. If you deselect Aligned, the sampled pixels are applied from the initial sampling point each time you stop and resume painting.
Select Impressionist to apply the pattern with an impressionistic effect.
Click on the Pattern Stamp Tool [S] from the Photoshop toolbar. The options for the pattern stamp tool will show
across the top of the screen. The options bar allows you to change the brush and brush size, the blending mode of the tool,
the opacity and flow of the pen used to paint the pattern and the pattern palette drop down menu.
If you select Aligned, you can release the mouse button without losing the current sampling point. As a result, the sampled pixels are applied continuously, no matter how many times you stop and resume painting. If you deselect Aligned, the sampled pixels are applied from the initial sampling point each time you stop and resume painting.
Select Impressionist to apply the pattern with an impressionistic effect.

 Clicking on the pattern selection drop down menu allows you to choose the pattern that you want to use in your image.
The three new patterns that we just created are shown at the bottom of the palette. Clicking the arrow in the palette
allows you to save the patterns that you create. You can also load different pattern libraries and reset the
pattern palette to the default patterns. You can also create and save your own pattern libraries. By choosing Save Pattern
from menu will allow you to save the pattern library with a name that you choose. The file is saved in the
Photoshop/Presets/Patterns directory.
Clicking on the pattern selection drop down menu allows you to choose the pattern that you want to use in your image.
The three new patterns that we just created are shown at the bottom of the palette. Clicking the arrow in the palette
allows you to save the patterns that you create. You can also load different pattern libraries and reset the
pattern palette to the default patterns. You can also create and save your own pattern libraries. By choosing Save Pattern
from menu will allow you to save the pattern library with a name that you choose. The file is saved in the
Photoshop/Presets/Patterns directory.
Now let's put your new patterns to some good use. In this example we will use one of the patterns
to create a wood texture on text. Open a new document and type some text. Be sure to use a fat font so the wood
grain has more area to cover. There are many sites on the internet to download free fonts. Searching these sites should
allow you to find the perfect font for you. I used the Arial Black font that is already found on most systems.
After creating your text, select the text by holding down the Ctrl key and clicking on the text layer in the
layers palette. This will draw a selection around the text so that the pattern stamp tool doesn't paint outside of the text.
You can not paint on the text layer unless it has been rasterized. Once rasterized the text is no longer editable.
Click the create new layer button in the layers palette. Now select the pattern stamp tool and choose the pattern that you wish to use.
Then clicking inside the selection will paint the chosen pattern in the shape of the text. In my example I
painted the pattern and the used the layer options to add a one pixel black stroke around the text.
 - -
 - -
 Now that you know how to create your own patterns, there is no limit to what you can do. If you have found
this tutorial useful, I would love to hear from you. Please enjoy the other areas of the site!
Now that you know how to create your own patterns, there is no limit to what you can do. If you have found
this tutorial useful, I would love to hear from you. Please enjoy the other areas of the site!
|
| | | |